Key Takeaways
Clean, consistent tattooing depends on controlling the entire path from pigment cap to skin. The following practices help professional tattoo artists and PMU specialists reduce interruptions without sacrificing hygiene or healed results.
- Match needle diameter, grouping, taper, and gauge to the procedure.
- Keep pigment mixed, covered, separated, and appropriately thinned.
- Balance voltage, stroke, hand speed, needle depth, and skin response.
- Wipe and rinse cartridges using a repeatable sterile technique.
- Replace a cartridge when damage, contamination, or persistent blockage remains.
Understand why tattoo needles clog
Tattoo needles clog when pigment dries or thickens from air exposure, when deep dipping or heavy ink overloads the grouping, or when excessive pressure or a damaged needle pulls tissue into the tip. Dried ink at the tip, thick pigment inside the housing, and tissue drawn into the opening can all reduce flow. Artists who understand the source of the obstruction can correct the setup without immediately increasing voltage or overworking the skin.
Identify dried ink, pigment buildup, and tissue contamination
Dried pigment usually appears as a crust around the tip or as intermittent spit-back after the cartridge has been exposed to air. Fresh pigment can also accumulate inside the opening when the artist repeatedly dips too deeply or works with a cap that is nearly empty. Tissue contamination is more serious: excessive pressure, an inconsistent depth, or a damaged needle can pull fluid and tissue into the cartridge.
The visual test is simple but should be performed carefully. If wiping the exterior restores flow briefly, the issue is likely surface buildup; if the cartridge continues to struggle, the obstruction may be internal or the needle may be damaged. A clear tip and stable pigment movement matter more than forcing a visibly clogged cartridge to continue.
Distinguish cartridge, needle grouping, and tube-related blockages
A cartridge problem may involve the membrane, housing, internal retention, or tip opening. A grouping problem may involve bent, dull, misaligned, or damaged needles. Tube-related blockage usually presents as pigment that enters poorly, exits inconsistently, or stops after repeated dipping. The same symptom can therefore come from different components.
A useful diagnostic sequence is to stop, inspect the tip under adequate light, and compare the needle movement with a known-good cartridge. Do not assume that a machine fault is responsible until the cartridge, grouping, and tube path have been checked separately. A technical reference on needle configuration and gauge can help artists compare diameter, taper, grouping, and pigment behavior before changing equipment.
Recognize how ink viscosity and environmental conditions affect flow
Thick or poorly mixed pigment requires more consistent loading and may expose a narrow grouping to blockage sooner. Temperature, evaporation, and time spent with an open cap also change how readily pigment moves. A formulation that flows well in one room may behave differently after sitting exposed to air during a long session.
Artists should assess the pigment before changing machine settings. A sudden voltage increase can make a marginal setup look temporarily better while increasing trauma, heat, or splatter. The goal is a predictable flow that matches the needle and hand, not the fastest possible movement.
Select and prepare the right needle setup
Match the configuration to the job, such as a 0403RLF for fine linework or a round shader or magnum for packing, and inspect each cartridge's fit and tip before the client is positioned. In a code such as 0403RLF, 04 is the needle diameter, 03 the needle count, and RLF the grouping (Round Liner Fine); 0405 and 0407 add needles at the same diameter, while 0603 or 0803 keep three needles at a larger diameter (#06 ≈ 0.20 mm, #08 ≈ 0.25 mm). Both diameter and needle count affect how much pigment the grouping carries and how easily it clears. The setup should also suit the machine, intended line weight, skin response, and the artist's established hand speed.
A professional cartridge inspection should happen before the client is positioned. Universal fit is useful only when the cartridge and machine actually seat securely and maintain compatible needle movement. Artists should also confirm the state and local health department requirements that apply to the products used in their practice.

Match needle configuration to linework, shading, or packing
A 0403 may support delicate detail where a narrow grouping and controlled hand are appropriate, while 0405 and 0407 can provide progressively more presence for linework. The final choice also depends on taper, which is not part of the code. For broader shading or packing, switch to a round shader or magnum (e.g., 1009RS, 1011M2), which carries pigment differently and may require a different speed and depth strategy.
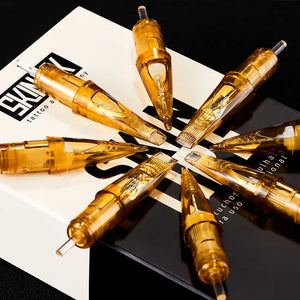
Skin Ink USA Fine Line Cartridges are documented as compatible with universal fit tattoo machines and designed for ultra-fine lines, dotwork, and intricate details. Their documented long taper, internal retention shells, and flexible silicone membrane are relevant when an artist needs controlled flow for delicate work, but they do not remove the need for correct technique.
Inspect cartridges for manufacturing defects and damaged tips
Before opening a sterile package, check the seal, expiry information, and package condition. After opening, inspect the tip for burrs, uneven needle height, visible bending, loose movement, or a housing that does not seat cleanly. A manufacturing defect can resemble a machine setting problem, so testing a questionable cartridge on practice material is safer than beginning directly on a client.
A damaged tip should not be rescued by increasing voltage. Dull or bent needles can increase trauma, distort lines, and carry tissue into the opening. The cartridge quality assessment guide covers cartridge anatomy, membrane mechanics, machine integration, and hygiene considerations that belong in this inspection step.
Keep needle depth and machine compatibility consistent
Needle depth should be set deliberately and then checked as the artist works. Excessive protrusion can increase drag and exposure to contamination, while insufficient protrusion can encourage repeated passes and pigment pooling. Machine stroke, give, grip position, and cartridge seating all influence the effective depth at the skin.
Universal fit should be treated as a compatibility claim to verify, not a substitute for a secure connection. The cartridge should sit firmly, the needle should move without abnormal wobble, and the machine should not force the grouping against the tip. If any of those conditions changes, the cartridge should be removed and assessed before continuing.
Prepare tattoo ink for reliable flow
Mix pigment according to the manufacturer's instructions, thin it only with an approved sterile medium, keep caps covered and moderately filled, and give each color its own cap. The artist should work from clean, properly labeled caps and use only products permitted by the applicable jurisdiction. Keeping the working volume controlled also limits evaporation, accidental dilution, and unnecessary exposure.
The same discipline applies to PMU work, where narrow configurations and small pigment volumes can make changes in viscosity especially noticeable. The objective is not to make every pigment thin; it is to use a consistency appropriate to the color, procedure, grouping, and skin.
Use properly mixed and appropriately thinned pigment
Pigment should be mixed according to the manufacturer's instructions and evaluated visually before loading. If thinning is permitted, the artist should use the correct sterile or approved medium rather than tap water or an improvised additive. Too much dilution reduces saturation, while overly thick pigment can overload a fine grouping and create repeated wiping or dipping.
A practical test is to load the cartridge and make a short pass on an appropriate disposable test surface. The pigment should move consistently without large blobs, excessive spray, or a dry start. If it does not, correct the ink preparation first; changing voltage cannot reliably compensate for unsuitable viscosity.
Avoid overfilling caps and exposing ink to air
Caps should contain enough pigment for controlled dipping without requiring the needle to strike the bottom. Overfilling increases spill risk and makes color separation harder, while underfilling encourages deep dips that can damage or contaminate the tip. Fresh caps placed within comfortable reach reduce unnecessary interruptions.
Pigment should remain covered or discarded according to studio protocol when it is no longer being used. Artists who organize caps, barriers, and labels before beginning can keep the machine moving without leaving open ink exposed.
Separate colors and prevent cross-contamination during setup
Each color should have its own disposable cap and clearly separated position on the station. Rinse cups, towels, gloves, and barriers must be managed so that a contaminated tool does not return to a clean pigment area. Color changes are especially vulnerable when the artist rushes the rinse or reaches across the station with a used glove.
A short setup map can prevent confusion: caps are placed in working order, diluted colors are labeled, and unused supplies remain outside the active zone. This is procedural hygiene, not decoration.
Control machine settings and hand technique
Keep voltage within a tested range for the grouping, change it only in small steps, and hold hand speed and needle depth steady so the cartridge loads and clears pigment predictably. A voltage that works for one grouping may be too aggressive for another, and a long taper may respond differently from a shorter one. Artists should make small, deliberate adjustments while watching pigment delivery, sound, skin response, and line quality.
The most reliable setting is the one that supports the intended deposit with minimal unnecessary trauma. It should remain stable across a controlled area rather than being changed repeatedly in response to every small interruption. Technique remains the primary variable even when the equipment is consistent.
Adjust voltage and stroke for the needle configuration
Start from the artist's tested range for the machine and grouping, then adjust gradually. A larger grouping, heavier pigment, or slower hand may require a different combination than a fine 0403 or 0405. Stroke and give also affect how the needle loads, contacts skin, and clears pigment from the cartridge.
Skin Ink USA Round Liner Cartridges are documented with high-quality materials, multiple configurations, and an advanced sealing system intended to prevent ink backflow. Those documented features can support a stable setup, but the artist still needs to match the cartridge to the machine and verify performance on the actual procedure.
Maintain consistent hand speed and needle depth
A slow hand paired with excessive machine speed can overwork the skin and create more fluid around the tip. A fast hand paired with insufficient power can produce weak deposits and repeated passes. Consistent movement gives the cartridge a predictable opportunity to load and release pigment.
Artists should watch the relationship between the machine and the skin rather than chasing a numerical setting. If the line becomes scratchy, the skin becomes unusually swollen, or pigment begins pooling, the artist should pause and reassess depth, speed, and configuration. Small corrections early are safer than compensating after trauma has accumulated.
Keep the needle and work area clear during tattooing
Wipe the tip with a horizontal stroke whenever buildup obscures it, rinse in a designated cup, and replace the cartridge when flushing no longer restores flow. Pigment, plasma, and other fluids can obscure the opening and the artist's view of the needle. The station should be arranged so wiping and rinsing can happen without crossing clean and contaminated zones.
The artist should use a frequency that matches the pigment and procedure. Heavy packing, textured skin, and longer passes may require more frequent cleaning than a short, controlled line. A clean visual field also helps reveal when the cartridge itself is failing.
Wipe the needle with the correct frequency and technique
Wiping should remove buildup without driving the needle vertically into the material. A horizontal movement across properly held gauze or an approved disposable wipe reduces the risk of a puncture. The artist should keep the cartridge oriented safely and avoid gripping the active tip while trying to clean it.
Rinse cartridges without diluting or contaminating pigment
Rinsing is intended to clear the cartridge, not to introduce rinse water into the working pigment. The artist should use a designated rinse cup, keep the cartridge movement controlled, and return to fresh pigment only after excess rinse has been expelled. Dirty rinse water should never be reused as if it were clean pigment.
A short rinse followed by a controlled wipe is usually preferable to prolonged agitation. If the cartridge spits diluted pigment after rinsing, the artist should allow the tip to clear on a disposable surface before touching the client's skin. This protects color consistency and keeps the working area easier to read.
Replace cartridges when flushing no longer restores flow
Repeated flushing is not a substitute for replacing a damaged or contaminated disposable cartridge. If the tip remains blocked, the needle wobbles, pigment continues to spit, or the grouping appears bent, the cartridge should be discarded according to studio and local waste procedures. Continuing may compromise the tattoo and increase skin trauma.
A replacement should be opened with clean gloves and introduced without disturbing the sterile field. The artist can then reassess the machine and pigment using the new cartridge rather than forcing the original one through a difficult section.
Troubleshoot a clog without compromising the tattoo
Stop contact with the client, check ink consistency before touching voltage, clear the tip with sterile technique, and discard the cartridge if flow does not return. The artist first protects the client and the sterile field, then identifies whether the issue is pigment, the cartridge, the machine, or technique. Rapid adjustments made without diagnosis often trade a flow problem for a skin-trauma problem.
The safest response is to pause before the cartridge begins dragging or depositing unevenly. The work area can be cleaned, the skin assessed, and the setup compared with the intended procedure. This keeps troubleshooting from becoming part of the tattoo itself.
Check ink consistency before changing machine settings
Inspect the cap, mix, and exposed pigment before touching voltage or stroke. Thickened pigment, an empty cap, or a contaminated rinse can create the same intermittent delivery seen with a machine that is underpowered. Preparing a fresh, correctly mixed cap is a low-risk first correction.
If flow remains poor after the ink is checked, the artist can make one small machine adjustment and test it away from the client area. The change should be judged by delivery and skin response, not by motor noise alone. A stable setup is more valuable than a dramatic short-term increase in output.
Clear buildup safely while maintaining sterile technique
The artist should stop contact with the client, change or manage gloves according to studio protocol, and keep used materials away from clean supplies. The cartridge can be wiped and rinsed using the established technique, then tested on a disposable surface. Any item that cannot be kept clean should be replaced.
The central rule is straightforward: protect the sterile field first. A few seconds spent resetting the station are preferable to carrying contamination back to the client or pigment cap. If the cartridge has contacted an unsuitable surface, it should not be returned to the procedure simply because it appears visually clear.
Determine when to discard the cartridge and restart
Discard the cartridge when flushing does not restore consistent flow, when a needle is bent or dull, when the membrane behaves abnormally, or when contamination is suspected. Restarting with a new cartridge also makes diagnosis easier because the artist can separate a defective component from a setting issue.
The restart should include a brief check of seating, protrusion, pigment consistency, and machine response. If the same failure occurs with a second cartridge, the artist should stop and inspect the machine rather than consuming more cartridges or continuing on compromised skin.
Prevent recurring cartridge and needle problems
Prevent repeat clogs with a pre-session checklist, sealed and dry storage for cartridges and pigments, and a log that tracks failures by brand, configuration, and machine settings. The relevant variables include cartridge configuration, gauge, taper, pigment viscosity, machine settings, hand speed, storage, and the condition of the skin. Recording those variables turns an irritating interruption into a diagnosable pattern.
A studio that treats cartridges as part of a controlled system can improve consistency without pretending that every setup behaves identically. Quality control also includes documentation, supplier verification, and compliance checks for the jurisdictions in which the artist works.
Establish a pre-session inspection and setup checklist
A short checklist should be completed before the client procedure begins. It should cover the cartridge package, configuration, gauge, machine connection, needle movement, pigment preparation, cap placement, rinse setup, and barrier integrity. The checklist should be practical enough to use every day rather than a long document that gets ignored.
The following sequence is compact enough for a working station:
- Confirm the sterile package, expiry information, and cartridge configuration.
- Check the machine connection, needle movement, protrusion, and intended stroke.
- Mix and label pigments, then place separate caps and a clean rinse cup.
- Prepare wipes, barriers, waste containers, and a replacement cartridge.
After setup, a brief test pass can reveal a poor fit or inconsistent flow before the client's skin is involved. The Ink Journal provides a useful place to review configuration, accuracy, hygiene, and compatibility topics when refining that checklist.
Store cartridges, pigments, and equipment under suitable conditions
Cartridges should remain sealed, dry, and protected from crushing, heat, and unnecessary handling. Pigments should be stored according to their labeling and kept away from temperature extremes or direct contamination. Machines, grips, and reusable equipment need cleaning and disinfection procedures appropriate to their materials and intended use.
Storage problems can create failures that appear during setup rather than in the storage area. A warped package, damaged seal, separated pigment, or unusual odor is a reason to quarantine the item and follow the supplier's instructions. Compliance documentation required by state and local health departments should be retained with purchasing records where relevant.
Track recurring failures by brand, configuration, and machine settings
A simple log can record the cartridge brand, code, gauge, taper, pigment, machine, voltage, stroke, hand speed, skin condition, and observed failure. Patterns often emerge after several sessions: one grouping may clog with a particular heavy pigment, or one machine may reveal wobble that another does not.
Skin Ink USA MAGNUM ROUND CARTRIDGE is documented with a two-row curved RM configuration, universal fit, a silicone membrane, and use for realism, black and gray, gradients, and large areas. Recording how a documented configuration behaves in the artist's own workflow is more useful than assuming that one cartridge suits every procedure.
The log should distinguish a confirmed defect from a technique adjustment or an environmental factor. That distinction helps the artist make informed purchasing and setup decisions while preserving a clear record for quality control.
Conclusion
Learning how to avoid clogging tattoo needles requires control over pigment, cartridge selection, machine settings, hand technique, cleaning, and replacement decisions. Professional artists and PMU specialists who inspect equipment, protect the sterile field, and record recurring failures can create cleaner, more consistent work without treating every clog as a reason to push the machine harder.
Frequently Asked Questions
What is the most common reason tattoo needles clog?
Surface pigment buildup, thickened ink, and tissue or fluid at the tip are common causes. The artist should inspect and clean the cartridge before assuming the machine needs more power.
Can a clogged cartridge be rinsed and reused during a tattoo?
A brief controlled rinse may restore flow when the obstruction is removable and sterile technique is maintained. If flow remains inconsistent or damage is visible, the disposable cartridge should be replaced.
Does a larger needle gauge clog less often?
Not necessarily. A larger gauge may carry pigment differently, but clogging still depends on viscosity, grouping, taper, dipping technique, machine settings, and skin response.
Should voltage be increased when pigment stops flowing?
Voltage should not be the first correction. The artist should check pigment consistency, tip buildup, needle condition, depth, and hand speed before making a small, deliberate setting change.
How often should an artist wipe the cartridge tip?
The frequency depends on pigment, skin, procedure, and the amount of fluid at the tip. The artist should wipe whenever buildup obscures the opening or the working view, using a safe horizontal technique.
Can dipping too deeply damage tattoo needles?
Yes. Contact with the bottom of a pigment cap can bend or misalign the needle, especially when the cap is low or the dip is uncontrolled. The artist should keep enough pigment available for a shallow, accurate dip.
When should an artist stop troubleshooting and discard the cartridge?
The cartridge should be discarded when cleaning does not restore consistent flow, when the needle is bent or dull, when the membrane or housing behaves abnormally, or when contamination cannot be confidently ruled out.